It appears as though this post just does not want to be written. Last night I had most of it written out, and then I lost it, man I hate that! This morning I was having a hard time getting the pictures to move down so that I could enter text, sheesh! I hope that's the end of the troubles.
So this is what I was trying to tell you last night :)
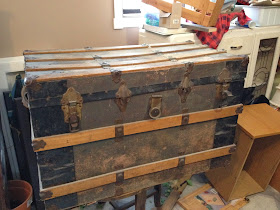
Years ago I was banned from bringing any more treasures junk home. Luckily, I have a short memory when it comes to some things. This piece however, was not added to my stash in one of my forgetful moments, this piece was delivered by a friend, to my husband. You see he can't say no to anybody but me! Now, had the friend brought it to me I truly would have refused it, because it was in terrible shape, and I didn't think it was worth getting in trouble over. Luckily fate intervened and I ended up with it.
Notice that the lid is caved in, the wood where the hinges were attached was broken right out, and the inside was a mess, and smelled very musty.
I turned the lid upside down on the floor and built supporting framework, slipped it inside and then stood on it to straighten out the top, then screwed it all down. It worked, a nice flat top!
Each step of the project was a decision, I started by painting it white and sprayed the hardware silver, I had a few ideas about black and white bold designs, but I kept being pulled toward something a little more rustic.
I added some gray, now if my goal was to make an old trunk look pretty good, it would be done, but I wanted more that.
I decided to go with a Railroad theme. My husband is retiring from the CNR after 35 years of riding the rails. The names on the trunk represent some of the sidings between Sioux Lookout and Armstrong, Ontario.
I googled CNR emblems and picked this one that would have been in use when I was a kid.
This is a look at the back.
I stripped the paper off the inside, sanded, stained, and varathaned it. Notice the supporting framework inside the lid, it should be good and sturdy now. I also stained the outside so it was aged. No more pristine white. It is actually darker and dirtier looking in person. It looks like it's been around a while.
I added a piece of wood where the hinges are attached because the old wood had broken out, therefore support was needed to re-attach them.
In the end, I'm happy with it, and that, after all, is why I do this, if you like it too, that's a bonus!
Sharing at:

Read more at http://diyshowoff.com/buttons/#TIuCXLt3c7lHO44M.99
Read more at http://diyshowoff.com/buttons/#TIuCXLt3c7lHO44M.99


I DO like it! :)
ReplyDeleteI love the way you just jump into something and fix it. The trunk is absolutely beautiful and I would never have figured out what to do. Congratulations to your husband on his retirement. My husband recently retired after 35 years building helicopters. I LOVE having him home.
ReplyDeleteI love what you have done with your trunk. I have one similar and have been toying around with the idea of doing a makeover on it. How did you paint the hardware? Mine are riveted so I'm not sure how to remove them for painting. Also did you treat the hardware with a rust remover before painting? My email address is connie_hall57@yahoo.com. Thanks so much for posting this fabulous makeover.
ReplyDeleteThis comment has been removed by a blog administrator.
ReplyDeleteDo you know what kind of paper is the one that usually covers the trunk?
ReplyDelete